
Let’s get started!
As I had mentioned in a previous post, my desire is to eventually host everything on my own infrastructure and if time permits try to use a DIY solution. However, given that I want to start sharing my journey from day 0, I need a temporary solution that is reliable, quick to setup, and requires minimal effort. Today, I would like to share how I setup this blog using a static website generator Hugo hosted on Github Pages with a Custom DNS using Cloudflare.
Hugo
Hugo is one of the most popular open-source static site generators. I have used it several times in the past for previous iterations of this blog and have found it a my goto choice when I need something quick.
Since I most likely will not be able to do better job than the [quick-start] guide found on Hugo’s documentation site I will be a bit brief in this portion. I started with creating a new repository on Github for this site, aptly named chunwu.dev, and cloned the repository down onto my local machine.
Please note that if you decide not to have a custom domain for your site and wish to leverage the default domain that Github provides you must setup your repository name as <user>.github.io. Otherwise your domain will come out as <user>.github.com/<repository-name>, which may not be ideal.
After I had Hugo installed and my Github repository cloned onto my machine, I created my site using the command hugo new site <repository>. Personally, I am a visual person so I start the web server right away with the defaults before I start modifying the site. You can do this by running hugo server -D in the directory of your site.
*We are using -D to ensure that draft publications are also show locally but when running live we simply use hugo server.
There are many places on the web where you can find Hugo themes. However, for today I used https://themes.gohugo.io/ and after brief search I settled on a blog theme called PaperMod.
I made some quick adjustments to my hugo.toml - a file used you to specify how you want the site. This can be it’s own tutorial For now I simply want to enable the theme, so I run echo "theme = PaperMod" >> hugo.toml. (hugo.toml and config.toml are interchangeable)
You should now be able to run your website.
Github Pages
Now that you have a functioning website locally, we commit the code back to your remote repository. We won’t dive into the specifics of how to use Github as a Code Versioning System or leveraging Github Actions for CICD, I have implemented Github Actions on my repository to automate deployment This can also be discussed in a future tutorial if there is a desire for it.
For now once we have a running website from the previous step, within your working directory. I ran the following commands:
git commit .
git commit -m "Initial Commit"
git push
Once your website is in the remote repository…
- Navigate to the Settings of your repository.
- On the left menu bar navigate to Pages.
- For Build and deployment, I have set my source as Github Actions.
- Go back to your local repository and create a folder called
workflowsinside a folder called.github - Copy and paste the following YAML into a file like
main.yaml
# Sample workflow for building and deploying a Hugo site to GitHub Pages
name: Deploy Hugo site to Pages

on:
  # Runs on pushes targeting the default branch
  push:
    branches:
      - master

  # Allows you to run this workflow manually from the Actions tab
  workflow_dispatch:

# Sets permissions of the GITHUB_TOKEN to allow deployment to GitHub Pages
permissions:
  contents: read
  pages: write
  id-token: write

# Allow only one concurrent deployment, skipping runs queued between the run in-progress and latest queued.
# However, do NOT cancel in-progress runs as we want to allow these production deployments to complete.
concurrency:
  group: "pages"
  cancel-in-progress: false

# Default to bash
defaults:
  run:
    shell: bash

jobs:
  # Build job
  build:
    runs-on: ubuntu-latest
    env:
      HUGO_VERSION: 0.126.0
    steps:
      - name: Install Hugo CLI
        run: |
          wget -O ${{ runner.temp }}/hugo.deb https://github.com/gohugoio/hugo/releases/download/v${HUGO_VERSION}/hugo_extended_${HUGO_VERSION}_linux-amd64.deb \
          && sudo dpkg -i ${{ runner.temp }}/hugo.deb
      - name: Install Dart Sass
        run: sudo snap install dart-sass
      - name: Checkout
        uses: actions/checkout@v4
        with:
          submodules: recursive
          fetch-depth: 0
      - name: Setup Pages
        id: pages
        uses: actions/configure-pages@v4
      - name: Install Node.js dependencies
        run: "[[ -f package-lock.json || -f npm-shrinkwrap.json ]] && npm ci || true"
      - name: Build with Hugo
        env:
          # For maximum backward compatibility with Hugo modules
          HUGO_ENVIRONMENT: production
          HUGO_ENV: production
          TZ: America/Los_Angeles
        run: |
          hugo \
            --gc \
            --minify \
            --baseURL "${{ steps.pages.outputs.base_url }}/"
      - name: Upload artifact
        uses: actions/upload-pages-artifact@v3
        with:
          path: ./public

  # Deployment job
  deploy:
    environment:
      name: github-pages
      url: ${{ steps.deployment.outputs.page_url }}
    runs-on: ubuntu-latest
    needs: build
    steps:
      - name: Deploy to GitHub Pages
        id: deployment
        uses: actions/deploy-pages@v4
Almost there, we need to commit the changes from our local repository to our remote repository. At the root of your local repository:
git commit .
git commit -m "Added a Github Action"
git push
If you navigate to your repository on Github and look at the Actions tab you should notice there is a workflow running called Deploy Hugo site to Pages. 
Once this Github Action runs it’s course you should be able to navigate to the domain Github provides you by default, in my case it is: https://cpwu.github.io/chunwu.dev/. When we setup Github Pages, you may have noticed a textbox under Custom domain that you can specify, it really is that simple.
Let’s get a custom domain from Cloudflare
Cloudflare
I have used a few domain name registrars in the past but most recently I moved over to Cloudflare. From what I understand, they offer domain registration with no mark-up pricing. However, there is a drawback some tlds may not be available. Luckily for me Cloudflare opened up the ability to purchase .dev domain’s last year. If you are not aware .dev must use an SSL certificate in order to load in major browsers. Github will take care if this for us.
To purchase a domain, create yourself an account on Cloudflare if you haven’t done so already and navigate to Domain Registration.
- Under Domain Registration navigate to Register Domains.
- Search for the desired domain name you are looking for.
- In my case
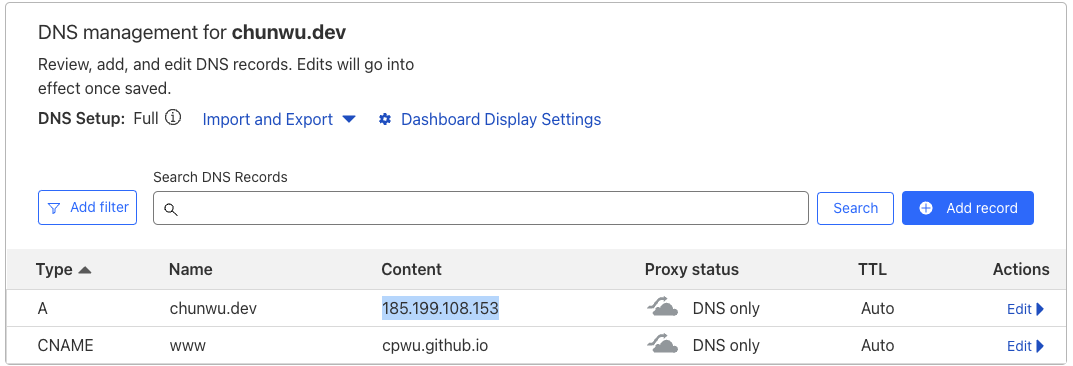
chunwu.devwas available for $10.18 USD. - Add an
Arecord for your newly purchased domain by specifying your domain name underNameand185.199.108.153for content. You can find the other Github IP addresses for Github pages here
Website up!
Now that you have your domain name setup, and your website published to Github pages you just need to navigate back to the Settings of your site’s Github repository. You should now be able to specify the domain name you purchased with Cloudflare into the textbox and after a few minutes your site will be live on the internet with a custom domain.
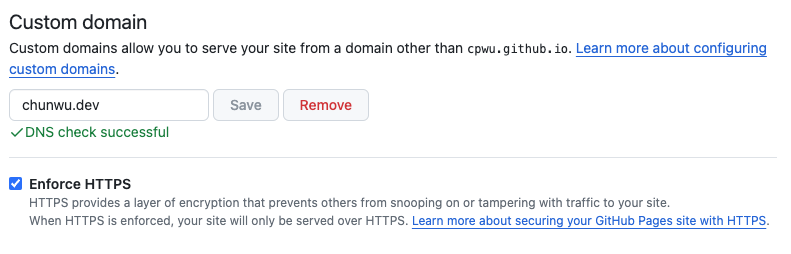
As previously mentioned, make sure you select the Enforce HTTPS option since this is a requirement for .dev domains and generally a good practice.